7/23/2020

Observe new subdomain using findomain + monitor flag (지속적으로 서브도메인 모니터링하기)

Hi hackers and bugbounty hunters. today I'm going to talk about findomain monitor options. Since the config option has been added, it is very simple to configure the monitoring environment. Speed, usability, everything => findomain

찾다보니 findomain에 monitor 옵션이 있어서.. 한번 적용해볼꼄 테스트하고 글로 작성합니다. findomain 초기부터 있던 옵션인데 불편한 사용방법(config 옵션이 없어서 host / user / pw 를 직접 넣어줘야했었죠..)으로 인해 사용하지 않다가 최근에 2.0 버전대로 올라오면서 config가 생겨서 겸사겸사 테스트 해봅시다.


Personally I like using amass / subfinder / findomain :D


Findomain Monitor option

If you look at the main options for today... -m -c option. The -m option is notify for you when you discover a new subdomain. The -c option is an option that you can use by saving several options as a setup file. Toml / json / hjson etc.

오늘 할 내용의 주요 옵션을 보면.. -m -c 옵션입니다. -m 옵션을 사용하면 새로운 subdomain을 발견할 때 노티를 줄 수 있습니다. -c 옵션은 여러가지 옵션을 설정 파일로 저장하여 사용할 수 있는 옵션입니다. toml / json / hjson 등을 지원합니다.


-m, --monitoring-flag    Activate Findomain monitoring mode.
-c, --config <config-file> Use a configuration file. The default configuration file is findomain and the format can be toml, json, hjson, ini or yml.


tttttoml!!! I like this!

(yeah! tttoml!!! I like this!)

Setup postgresql

Install postgresql

$ brew install postgresql
$ postgres --version
postgres (PostgreSQL) 12.3


Init postgresql

$ initdb /usr/local/var/postgres -E utf8


Start service

$ pg_ctl -D /usr/local/var/postgres start && brew services start postgresql


I had a version-related problem setting. It's a problem that I've been using postgresql for a long time. Please refer to

다만 전 문제가 발생했었는데요.. 혹시나 비슷한 케이스가 나온다면 참고하셔서 진행해주세요.


2020-07-23 00:42:38.908 KST [96367] DETAIL:  The data directory was initialized by PostgreSQL version 11, which is not compatible with this version 12.3.

=> 원인(Why?): 예전에 11버전때에서 init 해둔게 있어서, 충돌
=> 해결(Solution): $ rm -rf /usr/local/var/postgres ; initdb /usr/local/var/postgres -E utf8


Create database

$ createdb findomain
$ psql findomain


Findomain Config

You can connect to the DB using the options below. Even if you process alias or snippets such as profile or pet, it doesn't look very good to have many options. So let's solve it easily with config file.

아래와 같은 옵션들로 DB 연결을 할 수 있습니다. profile이나 pet 등 alias or snippet 처리를해도 옵션이 많은건 영 좋지 않은 모습입니다. 그래서 config 파일로 쉽게 해결해봅시다.


        --postgres-database <postgres-database>       Postgresql database.
        --postgres-host <postgres-host>               Postgresql host.
        --postgres-password <postgres-password>       Postgresql password.
        --postgres-port <postgres-port>               Postgresql port.
        --postgres-user <postgres-user>               Postgresql username.

(config 옵션은 상대적으로 최신버전에서 제공하는 기능입니다. 전 작년인가부터 findomain을 사용했는데 그땐 없었네요. 오랜만에 업데이트..)


I just made a config.toml file and path under .config. You can just do it however you like.

요즘 대다수 도구들의 config 경로로 자주 사용되는 경로에 구색만 맞춰서 넣어줍시다.


~/.config/findomain/config.toml

# Findomain configuration file. The following listed values are all the possible values you can set at the moment.
# IF YOU ARE NOT USING ONE OF THEM PLEASE LEAVE THIS EMPTY OR DELETE IT FROM THE FILE

postgres_connection = "Your postgres connection URI here in the following format: postgresql://user:password@host:port/database"
virustotal_token = "Your VirusTotal token here"
fb_token = "Your Facebook token here"
securitytrails_token = "Your SecurityTrails token here"
spyse_token = "Your Spyse token here"
c99_api_key = "Your C99.nl API Key here"
telegrambot_token = "Your Telegram bot token here"
telegram_chat_id = "Your Telegram chat ID here"
slack_webhook = "Your Slack webhook URL here"
discord_webhook = "Your Discord webhook URL here"


set postgres_connection and slack_webhook !

이번 작업에서 실제로 필요한건 postgres_connectionslack_webhook 정도니 필요하신 것들만 세팅합시다.


# findomain
postgres_connection = "postgresql://user:password@localhost:5432/findomain"
slack_webhook = "https://hooks.slack.com/services/~~~"


Testing

이제 subdomain scanning을 해보면, 결과가 slack으로 넘어가는걸 확인할 수 있습니다.

$ findomain -t hahwul.com -m -c ~/.config/findomain/config.toml


And you can see that it's stored in the DB :D

그리고 스캔한 이력은 postgresql에 저장되며 신규 도메인이 잡혔을 때만 slack으로 웹훅이 전달됩니다. db에는 간단하게만 저장되네요. id name timestamp


Share: | Coffee Me:

7/18/2020

pet and hack-pet. managing command snippets for security testing

Hi, hackers and bugbounty hunters :D

Today, I'd like to talk about how to easily manage your command snippet, and even more about a project that can share and use snippets together.

오늘은 여러분들의 command snippet을 쉽게 관리하는 방법, 그리고 더 나아가 snippet을 같이 공유하고 사용할 수 있는 프로젝트에 대한 이야기를 하려고 합니다.


What is pet?

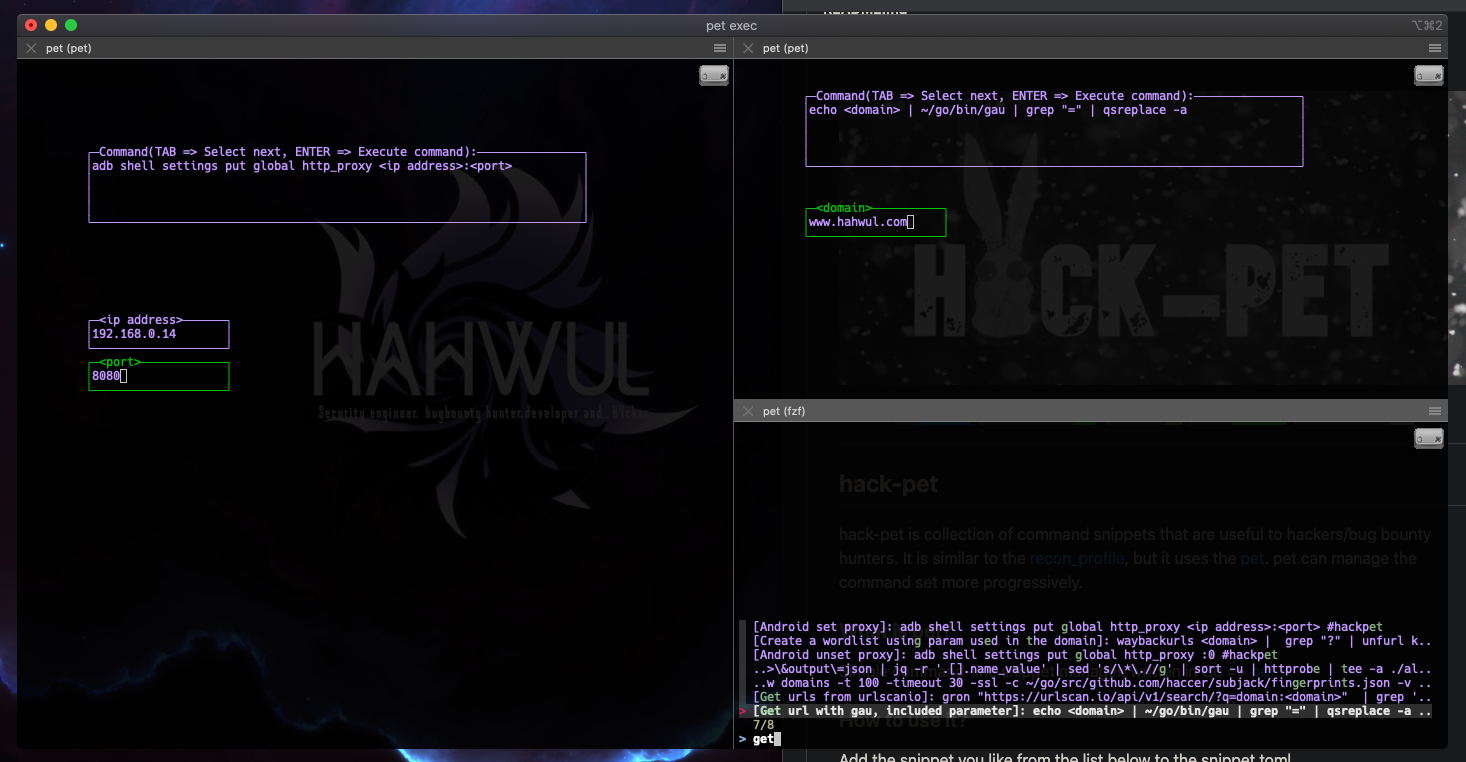
Recently, I found a very interesting tool. It is the command-line snippet manager called pet. It has a fast searchable interface such as fzf, and provides the ability to personalize and synchronize snippets through gist.

최근, 상당히 흥미로운 도구를 하나 발견했습니다. 바로 pet이라는 command-line snippet manager입니다. fzf 같은 빠른 검색이 가능한 인터페이스를 가지고있고, gist를 통해 snippet들을 개인화하고 동기화하여 관리할 수 있는 기능을 제공합니다.


$ pet 
pet - Simple command-line snippet manager.

Usage:
  pet [command]

Available Commands:
  configure   Edit config file
  edit        Edit snippet file
  exec        Run the selected commands
  help        Help about any command
  list        Show all snippets
  new         Create a new snippet
  search      Search snippets
  sync        Sync snippets
  version     Print the version number

Flags:
      --config string   config file (default is $HOME/.config/pet/config.toml)
      --debug           debug mode
  -h, --help            help for pet

https://github.com/knqyf263/pet


Install with go get

설치는 go get이면 충분합니다.


$ go get -u github.com/knqyf263/pet


There are several commands, but basically, there are no problems in using them if you know only the four (new list exec search).

여러 명령이 있지만, 기본적으로 4가지(new list exec search)만 확실하게 알고가면 사용하는데 전혀 지장이 없습니다.


$ pet new
Command> Your command
Description> Your Desc

You can use variables (<param> or <param=default_value> ) in snippets.

new로 새로운 snippet을 등록할 수 있습니다. 이 때 <> 같은 패턴을 통해 사용자로 부터 인자값을 받을 수 있습니다.


$ pet new
Command> echo <param> | ~/go/bin/gau | grep "=" | qsreplace -a
Description> Find url included parameter, from gau


Show list

list는 저장된 리스트를 봅니다.


$ pet list
pet list
Description: ps elf!
    Command: ps -elf
------------------------------
...snip...
------------------------------
Description: Find url included parameter, from gau
    Command: echo <param> | ~/go/bin/gau | grep "=" | qsreplace -a


and exec(if you select, run command) or search(if you select, show command)

exec는 즉시실행, search는 쿼리 보기정도입니다.


$ pet exec
https://www.hahwul.com/search?updated-max=2019-12-05t02%3A04%3A00+09%3A00
https://www.hahwul.com/2015/12/coding-htmljavascript-code-for-popup.html?showcomment=1532047391164
https://www.hahwul.com/2019/11/burp-suite-using-tor-network.html?m=1
http://www.hahwul.com/2015/06/operator-overloading-for-python-code.html?showComment=1434687933593
http://www.hahwul.com/2015/09/design-sql-injection.html?showComment=1466006407930
http://www.hahwul.com/2016/01/exploit-android-sensord-local-root.html?showComment=1487266696141
http://www.hahwul.com/2016/01/java-java-applet-simle-code-for-java.html?showComment=1482295236658
http://www.hahwul.com/2016/02/metasploit-default-shell-meterpreter.html?showComment=1456212183726
http://www.hahwul.com/2016/07/metasploit-meterpreter-paranoid-mode.html?showComment=1495406771315
http://www.hahwul.com/2016/07/metasploit-meterpreter-railgun-useful.html?showComment=1477038507834
http://www.hahwul.com/2016/07/ruby-writing-web-crawler-with-ruby-and.html?showComment=1467938120314
http://www.hahwul.com/2016/08/hacking-mobile-application.html?showComment=1482063530341
http://www.hahwul.com/2017/01/hacking-microsoft-windows-kernel.html?showComment=1485360093822
http://www.hahwul.com/2017/02/metasploit-hardware-pentest-using.html?showComment=1487524773751
http://www.hahwul.com/2017/02/python-pudbconsole-base-debugger-python.html?showComment=1488463407073
http://www.hahwul.com/2017/03/web-hacking-data-xss-filtering-bypass.html?showComment=1491831511270
....


Shortcut key binding

To use it after registering snippet, you need to issue a command such as pet exec to cli. This is a bit annoying, so it is very convenient to do key mappings through zsh/bash rc. In my case, I mapped it with Ctrl+s.

snippet을 등록한 이후에 이를 사용하려면 cli에 pet exec 등의 명령을 쳐야합니다. 이는 조금 귀찮은 일이기 때문에 zsh/bash rc를 통해 키 매핑을 해두면 굉장히 편합니다. 저의 경우는 Ctrl+s 로 매핑해두었습니다.

zsh.rc

function pet-select() {
  BUFFER=$(pet search --query "$LBUFFER")
  CURSOR=$#BUFFER
  zle redisplay
}
zle -N pet-select
stty -ixon
bindkey '^s' pet-select


bash.rc

function pet-select() {
  BUFFER=$(pet search --query "$READLINE_LINE")
  READLINE_LINE=$BUFFER
  READLINE_POINT=${#BUFFER}
}
bind -x '"\C-x\C-r": pet-select'


If you apply it with the source command afterwards, you can see that pet is executed immediately when the shortcut key is pressed.

이후에 source 명령으로 적용해보면 단축키를 눌렀을 떄 바로 pet이 실행되는 걸 볼 수 있습니다.


$ source ~/.zshrc
$ source ~/.bashrc


Um.. share snippet? for we for hackers for bounty hunters?

As I was using pet, I thought it would be good to use it while sharing. So we looked at the function of pet sync more, but as a result, it is a form that only individuals can share and use (because it is a gist based on their git token..)

pet을 사용하다보니 공유하면서 사용하면 좋을 것 같다는 생각이 들었습니다. 그래서 pet sync 쪽 기능을 좀 더 알아봤지만, 결과적으론 개인만 공유하며 쓸 수 있는 형태입니다(자신의 git token 기준의 gist라서..)


So I was thinking about a project similar to the WebHackersWeapons I created earlier. First, if you do pet edit, you can modify the snippet information saved as a text file. Through this, you can check the path and format of the saved file. At this time, the location of the original is ~/.config/pet/snippet.toml and I am using TOML.

그래서 예전에 만든 WebHackersWeapons와 유사한 프로젝트를 고민하게 됬습니다. 우선 pet edit 를 하게 되면 text 파일로 저장된 snippet 정보를 수정할 수 있는데, 이를 통해 저장되는 파일의 경로와 포맷을 확인했습니다.

이 때 원본의 위치는.. ~/.config/pet/snippet.toml 이고 TOML을 사용하고 있네요.


[[snippets]]
  description = "Find url included parameter, from gau"
  command = "echo <param> | ~/go/bin/gau | grep \"=\" | qsreplace -a"
  output = ""


What is TOML

First, let's take a look at the pet behavior a little more. First of all, pet uses TOML when storing all information such as config / snippet.

자 먼저 pet의 동작에 대해 조금 더 살펴봅시다. 우선 pet은 config / snippet 등 모든 정보를 저장할 떄 TOML을 사용합니다.

TOML은 YAML, JSON 등과 같은 데이터 포맷이고 개인적으로 가시성이 좋기 때문에 좋아하는 포맷입니다.


TOML aims to be a minimal configuration file format that's easy to read due to obvious semantics. TOML is designed to map unambiguously to a hash table. TOML should be easy to parse into data structures in a wide variety of languages.

https://github.com/toml-lang/toml


golang TOML Parse

Since I am using go, I searched for a go library that can parse TOML. Typically, toml and go-toml seem to be used, and I chose a go-toml with active commit.

저는 일단 go를 쓰고 있기 때문에 TOML을 파싱할 수 있는 go library에 대해 찾아봤습니다. 대표적으로 tomlgo-toml 이 사용되는 것 같고 commit 이 활발한 go-toml을 선택했습니다.


https://github.com/BurntSushi/toml

=> last change : 2 years ago

https://github.com/pelletier/go-toml

=> last change : 9days ago


writing simple code...

이제 테스팅용 코드를 짜보면..


package main

import (
	"github.com/pelletier/go-toml"
	"fmt"
	"os"
)

type PetSnippet struct {
	Description string `toml:"description"`
	Command     string `toml:"command"`
	Output      string `toml:"output"`
}


func check(e error) {
	if e != nil {
		panic(e)
	}
}

func main(){
	data := PetSnippet{Description: "abcd",Command: "abcd",Output: "abcd"}
	b, err := toml.Marshal(data)
	check(err)
	buffer := "[[snippet]]\n"+string(b)+"\n"
	fmt.Println(buffer)
	f , err := os.Create("asdf.daml")
	check(err)
	_, err = f.Write([]byte(buffer))
}
$ go run main.go
[[snippet]]
command = "abcd"
description = "abcd"
output = "abcd"

$ cat asdf.daml
[[snippet]]
command = "abcd"
description = "abcd"
output = "abcd"


Yeaaaaa

크게 무리없이 잘 되네요!


hack-pet !

So, since last night, I've been writing code. It is a tool to create and manage hackpet.toml, which contains all snippet information, and ./snippets directory that stores each individual file.

그래서, 어제 밤부터 후다닥 코드를 작성해봤습니다. 모든 snippet 정보를 담고있는 hackpet.toml 과 각 개별 파일로 보관하는 ./snippets directory 를 만들고 관리할 수 있는 도구입니다.


https://github.com/hahwul/hack-pet


You can read and apply the desired snippet.toml from ./snippets or copy hackpet.toml to pet's snippet.toml file and use it. After copying, hack-pet snippets will appear in the pet command.

./snippets 에서 원하시는 snippet.toml 을 읽어 적용하시거나 hackpet.toml 을 pet의 snippet.toml 파일로 복사하셔서 사용하시면 됩니다.


$ cat ./hackpet.toml >> ~/.config/pet/snippet.toml


복사한 이후에는 hack-pet의 snippet들이 pet 명령에서 나타나게 됩니다.


Conclusion

We need your help to share and activate good snippets. Be a good Contributer!


Share: | Coffee Me:

7/04/2020

One custom certificate, Using all tools and your devices (for bug bounty/pentesting)

I use both Burp pro/ZAP/Cli base proxy. When it comes to simply testing the web, it doesn't come as big, but when testing mobile, the certificate is quite annoying. (Especially the test phones that are temporarily used..)

So, starting this year, we have created a custom certificate rather than the default certificate for each tool and applied it to various tools. Today I am writing as a way to create a custom certificate and apply it to various devices and tools.


저는 Burp pro / ZAP / Cli base proxy 3가지 모두를 사용합니다. 단순히 웹만 테스팅할 땐 크게 와닿지 않지만, 모바일을 테스트할 땐 인증서가 상당히 귀찮습니다. (특히 임시로 사용하는 폰들은..)

그래서 올해부터 Burp / ZAP 등의 기본 인증서가 아닌 별도로 인증서를 생성해서 모든 테스팅 기기가 공유 하면서 사용하고 있는데요. 최근에 회사 맥북을 변경 하면서 다시 세팅이 필요해서 겸사겸사 메모 했던 걸 글로 풀어 봅니다.


TL;DR

# make key
openssl genrsa -out ca.key 2048

# make cert 
openssl req -days 365 -key ca.key -x509 -new -nodes -sha256 -out ca.pem

# make PKCS#12 file
openssl pkcs12 -out ca.p12  -inkey ca.key -export -in ca.pem

# on burp 
# Proxy > Options > Import / export CA Certificate > Add ca.p12 

# on ZAP
# Options > Dynamic SSL Certificate > Load > Add ca.p12 

# on iOS 
# Settings > General > Profile & Device Management > Installation
# Settings > General > Information > Certificate trust settings > Trust the registered certificate

# on Mac
# double click pem file > Add system keychain > Set trust all this pem


Make you custom certificate file

First, create a key file

먼저 키 파일을 생성 해줍니다.


openssl genrsa -out ca.key 2048


Next, let's create an x509 certificate with the generated key file. Importantly, -days options.

Due to the iOS policy, certificates created after September 2020 cannot have an expire time of 368 days or more. So I set it to 365 days.


그다음 생성된 키 파일로 x509 인증서를 만들어 줍시다. 여기서 중요한 건 -days 옵션으로 유효 기간을 1년으로 지정해 주었는데, 이는 iOS쪽 인증서 정책으로 인해 1년 이상의 인증서는 유효하지 않게 보기 때문에 1년으로 주었습니다.


openssl req -days 365 -key ca.key -x509 -new -nodes -sha256 -out ca.pem


https://support.apple.com/en-us/HT211025

What's changing
TLS server certificates issued on or after September 1, 2020 00:00 GMT/UTC must not have a validity period greater than 398 days.

This change will affect only TLS server certificates issued from the Root CAs preinstalled with iOS, iPadOS, macOS, watchOS, and tvOS. Additionally, this change will affect only TLS server certificates issued on or after September 1, 2020; any certificates issued prior to that date will not be affected by this change.

Connections to TLS servers violating these new requirements will fail. This might cause network and app failures and prevent websites from loading.


2020.09.01 이후 생성된 인증서 부터 적용이라 기존에 쓰시는 건 크게 지장 없을 순 있는데요, 요즘 GTS(Google Trust Services) 인증서도 갱신 주기를 짧게 가져가고 있어서, 어찌보면 구글도 비슷한 정책을 적용할 수도 있다고 생각이 드네요. (다만 COVID19로 인해 모든게 딜레이 되었으니 당분간은 괜찮을 거에요)


GTS... 3month??


Next, it is created with PKCS#12. This supports DER and PKCS#12, #11 for both Burp / ZAP. Just make it according to your personal preference.

다음으론 PKCS#12 로 생성해줍니다. 이는 Burp / ZAP 모두 DER과 PKCS#12, #11을 지원하는데요. 그냥 개인의 기호에 따라 만들어주시면 됩니다.


p12 파일 생성

openssl pkcs12 -out ca.p12  -inkey ca.key -export -in ca.pem


The difference is that PKCS#12 has both the certificate/private key in the file.

다른 점은 PKCS#12가 파일 내 인증서/개인키를 모두 가지고 있다는 점입니다.


p12 / pem summary

[ Add pkcs12 ]
on Burp
on ZAP

[ Add pem file ]
Android 
iOS
Mac Application
Etc..  


on Burpsuite

Proxy > Options > Import / export CA Certificate > Add ca.p12

At this time, it asks for the password. Enter the password used to create p12 (pkcs12).

이 때 패스워드를 물어보는데, p12(pkcs12) 생성 시 사용한 패스워드를 넣어 줍니다.


on ZAP

Options > Dynamic SSL Certificate > Load > Add ca.p12

p12 password, same here

Burp와 동일하게 p12 파일 만들 때 사용한 패스워드를 같이 입력해 줍니다.


for MAC Application

When testing PC applications such as Mac/Windows, a lot of local proxies are used. At this time, it is convenient to register a certificate and set trust in each OS. I only have a Mac environment, so I only write on a Mac basis.

Open the ca.pem file you just created in finder. Then, it will be registered directly in the keychain. At this time, you can always set it to Trusted by double click pem file > Add system keychain > Set trust all this pem


Mac/Windows 등 PC application을 테스트할 땐 로컬 프록시를 많이 이용하는데요,이때 각 OS에도 인증서를 등록하고 신뢰설정 해두면 편리합니다. 저는 Mac 환경만 있으니 Mac 기준으로만 작성합니다.

아까 만든 ca.pem 파일을 finder에서 열어줍니다. 그러면 키체인에 바로 등록이 되는데요, 이 때 인증서 클릭 > 정보보기 > 신뢰설정에서 모두 항상 신뢰함으로 설정해 주시면 됩니다.


for iOS Devices

Download pem file on iOS devices and install it. I just moved the file to Airdrop and installed it.

Settings > General > Profile & Device Management > Installation

After that, you need to set the trust of the certificate for not problem.

Settings > General > Information > Certificate trust settings (at the bottom) > Trust the registered certificate


pem 파일 받아서 설치해주시면 됩니다. 저는 그냥 Airdrop으로 파일 이동 후 설치했습니다.

설정 > 일반 > 프로파일 및 기기 관리 > 설치

이후에 인증서 신뢰설정을 해줘야 문제없이 사용이 가능합니다.

설정 > 일반 > 정보 > 인증서 신뢰설정(맨 아래) > 등록한 인증서 신뢰처리


for Android Devices

Since Android 7, the difference in user/system certificate authority, simply put it into the sdcard and install it, all traffic is not caught. So I need to put the PEM file in the system certificate path. (If you did the above using DER format, you must create a pem file by format conversion. openssl x509 -inform DER -in "cacert.der" -out burp.pem)

안드로이드는 7 이후부터 사용자/시스템 인증서 권한 차이로 단순하게 sdcard에 넣어서 설치하는 방법으론 모든 트래픽이 잡히지 않습니다. 그래서 PEM 파일을 system 인증서 경로에 넣어줘야합니다.

(만약 위 과정을 DER로 하셨다면 포맷 변환으로 pem 파일을 만들어줘야합니다 openssl x509 -inform DER -in "cacert.der" -out burp.pem)


First, look at the subject hash of the pem certificate file with openssl. The 8-character hash value is displayed.

먼저 openssl로 pem 인증서 파일의 subject hash를 봅니다. 8글자의 해쉬값이 나타닙니다.


openssl x509 -inform PEM -subject_hash_old -in ca.pem

0bcb8637
-----BEGIN CERTIFICATE-----
MIICuDCCAaACC


Now rename the pem file to hash + .0. The reason for this change is that it is the format used by the Android system.

이제 pem 파일의 이름을 hash + .0 로 바꿔줍시다. 이렇게 변경하는 이유는 안드로이드 시스템에서 사용하는 포맷이기 때문이에요.


cp ca.pem 0bcb8637.0


Then, put the file as /sdcard as adb and remount the android system to grant write permission.

그다음 adb로 파일을 /sdcard로 넣어준 후 android system을 remount 하여 쓰기 권한을 부여합니다. (기본적으론 readonly)


adb push 0bcb8637.0 /sdcard
adb shell
$ su
$ mount -o remount,rw /system
$ cp /sdcard/0bcb8637.0 /system/etc/security/cacerts/
$ chmod 644 /system/etc/security/cacerts/0bcb8637.0


Then, put the file as /sdcard as adb and remount the android system to grant write permission.

그다음 위와 같이 system 인증서 경로(/system/etc/security/cacerts/) 에 넣어 주시고 권한 설정만 해주시면 끝납니다.


Share: | Coffee Me:

6/20/2020

Bypassing string base XSS protection with Optional chaining

Hi hackers and bugbounty hunters :D 

Today, I share very very very simple tip for xss.

I found an interesting XSS code while reading your tweet.

트윗을 보다가 재미있어 보이는 XSS 페이로드를 봤습니다.

void''??globalThis?.alert?.(...[0b1_0_1_0_0_1_1_1_0_0_1,],)


Sometimes, shared from hunters, payload certainly contains hints for us to solve the defense against XSS. So I took a quick look at Payload and thought about whether there was a technology that could actually be used.

역시 잘 동작하고 있구요. 이런 페이로드에서는 분명히 우리가 XSS에 대한 방어로직을 풀 수 있는 힌트가 들어있기 마련입니다. 그래서 페이로드를 한번 가볍게 살펴보고 실제로 쓸만한 기술이 있을지 고민을 해봤습니다.


TL;DR

// if string base xss protection like this
document.cookie => filtered

//bypass it this code
document?.cookie => bypassed


Analysis This Payload!

globalThis is the same as this. Just returns an object with a global this value.

globalThisthis와 동일합니다. 그냥 전역 this 값을 가진 객체를 반환합니다.


globalThis?.alert?.()

.=> alert()


https://developer.mozilla.org/en-US/docs/Web/JavaScript/Reference/Global_Objects/globalThis


결국 풀어서 보면 아래와 동일한 코드가 됩니다.


this.alert()


One interesting thing is that ? is added to objects such as globalThis and alert, but the absence of colon is felt simply as a not ternary operator. I searched for something because I didn't know, and mdn says this is "Optinal chaining".

하나 재미있는건, globalThis , alert 과 같은 객체에 모두 ? 를 붙여준건데요, 단순히 삼항연산자라고 보기엔 콜론의 부재가 느껴집니다. 잘 모르던거라 찾아봤더니 Optinal chaining 라고하네요.


Finally, a string starting with 0b is a simple binary value.

0b 는 2진수 패턴으로 저 값은 2 진수로 10100111001을 의미합니다. 자릿수 사이의 _ 는 그냥 크게 의미 없는 값입니다.


...[0b1_0_1_0_0_1_1_1_0_0_1,],

=> 1337
0b101101

=> 45


What is optional chaining?

Optional chaining allows you to read property values that are deep within the linked object chain without explicitly verifying that each reference in the chain is valid. '?.' behaves similar to ',' but if the reference is null or undefined, the return value is undefined and returns undefined if there is no function during the function call phase.

optional chaining는 체인의 각 참조가 유효한지 명시적으로 검증하지 않고, 연결된 객체 체인 내에 깊숙이 위치한 속성 값을 읽을 수 있습니다. ?. 는 '.' 과 유사하게 동작하지만, 만약에 참조가 null이나 undefined가 발생한다면 리턴값이 undefined가 되고 함수 호출 단계에선 함수가 없다면 undefined라 리턴됩니다. 만약에 document.location 이런 형태로 문자열 검증이 있다고 할 때 document?.location 이런 형태로 우회해서 사용해볼 여지는 있네요.


https://developer.mozilla.org/en-US/docs/Web/JavaScript/Reference/Operators/Optional_chaining


Bypassing xss protection with optional chaining

If your case, filtered like the string 'document.cookie', you can use optional chaining.

만약 document.cookie라는 문자열을 필터링한다면 optional chaning 을 이용해 우회가 가능할 것 같네요.


document.cookie => filtered
document?.cookie => bypassed


특정 객체들을 참조하지 못하도록 막아놓은 상태에선 쓸만한 것 같습니다~ (물론 다른 방법도 많겠지만요)


Share: | Coffee Me:

6/16/2020

E-mail 포맷을 이용한 여러가지 Exploiting 기법들 (You've got email pwned korean review)

Recently, the nahamcon2020 was in over. I difficult to watching it in my time zone, so I just looked at the documents after it's over. They were all very interesting and I learned a lot of new things. Today I'm going to talk about the email attack that I saw the most interesting among them.

Of course, if you using english, best document is original material, so refer to the link below, and I will write only in Korean today!


https://drive.google.com/file/d/1iKL6wbp3yYwOmxEtAg1jEmuOf8RM8ty9/view 


서론이 길었군요. 정말 오랜만에 글을씁니다. COVID19 이후 벌써 반년정도 재택근무를 하고 있고, 출퇴근 시간을 아끼다보니 블로그 글을 쓰는 시간보다 개발하거나 개인적인 연구를 하는 시간이 좀 더 늘어난 것 같습니다. (글 쓸 시간이 없었다고 핑계를 대는중)


아무튼 최근에 Nahamcon2020이 진행됬고, 이 글을 읽는 여러분들과 동일하게 우리의 타임존은 정말 심각한 새벽이기 때문에 직접보기에는 조금 어렵습니다. 솔직히 진짜 내용 다 재미있고 놓쳤던 부분들을 다시 한번 체크하게 해주는 내용들이 꼭 읽어보시길 바랍니다.


Who, What, Where, When, Wordlist

You've Got Mail Pwned

Owning Online Games with only web hacking experience

Practical Attacks Using HTTP Request Smuggling

나머진 아직 못찾았어요..


오늘은 그중에선 Email에 대한 이야기를 할거구요. 가볍에 어떤 내용인지만 정리하려고 합니다. 실제 케이스들은 직접 발표자료 보셔서 확인하시는게 제일 좋을 것 같아요.


E-mail address?

Email의 포맷은 local part + domain part 로 구성되어 있습니다.


localpart

기본적으로 local part는 영 대소문자 + 숫자, . 과 일부 특수문자 정도만 사용 가능합니다.


Latin letters A-Z and a-z 
 - a@example.com
 
Digits 0 to 9
 - 1337@example.com
 
Dot . (Not first character, not last one, no consecutive dots
 - john..doe@example.com
 
Printable characters !#$%&'*+-/=?^_`{|}~
 - alice&john!@example.com
 
International characters (above U+007F, encoded as UTF-8)
 - jöhn.døê@gmail.com


다만 더블 쿼터(") 로 쌓여있다면 이야기가 달라집니다. " ( ) , : ; < > @ [ ] , space, tab, emoji 등 일반적인 상황의 local part에서 쓸 수 없는 문자들을 사용할 수 있어집니다.


Extra characters: "(),:;<>@[\]
- "\"@example.com (quotes and backslashes need a backslash)
- "@"@example.com

Spaces, tabs
- " "@example.com

Even emoji’s
- "�"@gmail.com


domain part

는 아시다싶이 대소문자 + 숫자, - 정도만 가능합니다. 이건 고정된 포맷이라 건드릴수가 없습니다.


Payloads

자 위에서 일부 특수문자를 보신순간 바로 몇가지 떠오르셨겠지만 결국 email의 local part, 즉 사용자 이름 부분에 특수문자를 사용할 수 있다는 의미고 특수문자를 기반으로 한 웹 공격에는 모두 사용될 수 있는 의미이기도 합니다.


TypePayload
XSStest+(<script>alert(0)</script>)@example.com
test@example(<script>alert(0)</script>).com
"<script>alert(0)</script>"@example.com
SSTI"<%= 7 * 7 %>"@example.com
test+(${{7*7}})@example.com
SQLi"' OR 1=1 -- '"@example.com

"mail'); DROP TABLE users;--"@example.com
SSRF (Era of ssrf)john.doe@abc123.burpcollaborator.net
john.doe@[127.0.0.1]
Parameter pollutionvictim&email=attacker@example.com
Email header injection"%0d%0aContent-Length:%200%0d%0a%0d%0a"@example.com
"%0d%0aContent-Length:%200%0d%0a%0d%0a"@example.com
Wildcard abuse%@example.com


예를들면, A라는 시스템이 사용자의 email 정보를 저장해서 어드민에 뿌려주는데, 이 떄 일반적인 email 검증 패턴으론 hahwul@gmail.com<svg/onload=alert(45) 같은 페이로드는 잘 걸러집니다. (왜냐면 도메인 파츠에선 특수문자를 사용할 수 없으니깐요) 또한 유저 이름 구간에 들어간다고 해도, 그 결과는 동일합니다. < > 등을 사용할 수 없는건 마찬가지죠.


이제 우리는 "( ) 등을 이용해서 사용자 이름 구간에 특수문자를 삽입하는 법을 알았으니, 이런 방식의 공격코드 구성이 가능해집니다.

"hahwul<svg/onload=alert(45)>"@gmail.com


다른 케이스도 비슷비슷합니다.

Bypassing verify logic

두번쨰, 이러한 규칙을 이용하면 bypassing을 위한 특별한 케이스를 만들어낼 수 있습니다. 아래 2가지 케이스를 보면 ..

john.doe+intigriti@example.com → john.doe@example.com
john.doe(intigriti)@example.com → john.doe@example.com


위에껀 + 가 붙은 경우인데, 이 때 + 뒤의 문자열은 무시되고 앞의 local part 를 기준으로 메일주소로 인식합니다. 두번째도 비슷한데, ( ) 안의 문자열은 무시됩니다.


이제 각종 검증 로직 우회를 위한 패턴을 만들어낼 수 있습니다.


inti(;inti@inti.io;)@whitelisted.com
 → inti(; 
 → inti@inti.io → my inbox!
 → ;)@whitelisted.com
 
inti@inti.io(@whitelisted.com)
inti+(@whitelisted.com;)@inti.io


Conclusion

이게 단순히 email system에서만 사용되는거라면, 그냥 가볍게 볼 내용이지만 실제로 Email format은 다른 웹 서비스/환경에서도 굉장히 많이 사용되고 있는 패턴이라 잘 숙지해둬야할 것 같네요 :D

Share: | Coffee Me:

5/31/2020

Setup bugbounty hunting env on termux :D

The termux in my memory was Linux on Android, which was only available with some Linux commands.

So I usually remember using it on rooting device. Recently, I found out that packages such as rust and golang can be used on termux among tweets from 1ndianl33t, so I finally set them up on the test phone today. writing note for me :D


제 기억속의 termux는 일부 리눅스 명령 사용만 가능한 안드로이드 위의 리눅스였습니다.

그래서 보통 루팅과 함께 사용했던 기억이 있네요. 최근에 1ndianl33t 와의 트윗 중 termux에서 rust, golang 등의 패키지 사용이 가능한걸 알고 오늘에서야 테스트폰에 세팅을 진행했습니다. 메모 차원에서 작성해둡니다 :D


Oneline script for me

$ pkg install rust perl make golang git vim nmap htop ; cargo install findomain; go get -v github.com/projectdiscovery/naabu/cmd/naabu; go get -u github.com/tomnomnom/meg;  go get -v github.com/projectdiscovery/subfinder/cmd/subfinder; go get -u github.com/tomnomnom/qsreplace; go get -u github.com/tomnomnom/httprobe; go get github.com/haccer/subjack; go get -u github.com/tomnomnom/assetfinder; git clone https://github.com/hahwul/dalfox ; cd dalfox ; go install; git clone https://github.com/tomnomnom/hacks ; 


Install important package(rust, perl, make, golang, git)

$ pkg install rust perl make golang git vim


Install RUST base tool

$ cargo install findomain

etc...


Install golang base tool

$ go get -u github.com/tomnomnom/meg
$ go get -v github.com/projectdiscovery/subfinder/cmd/subfinder
$ go get -u github.com/tomnomnom/qsreplace

etc...


building golang package

$ git clone https://github.com/hahwul/dalfox
$ cd dalfox
$ go build
$ ./dalfox

or go install


etc...


Share: | Coffee Me: